
Hello all!
We've decided to move the blog over to Wordpress. It can now be found here. Looking forward to seeing you over there!
Thursday, October 1, 2009
Sunday, September 6, 2009
Handspun Foliage
Yarn: Handspun by Frances
Needles: Size 9
Pattern: Foliage by Emilee Mooney on Knitty
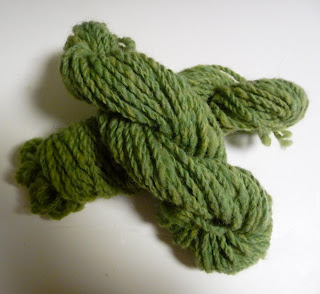
The yarn (above) was a nice wool, fairly evenly spun at about a worsted weight. I enjoyed the pattern - it was really quick to knit up, especially after the shawl of doom.
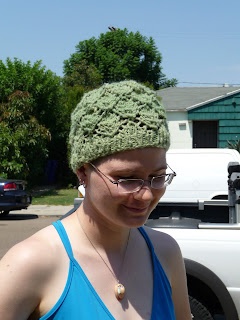 Frances was a good sport and modeled the hat for me, despite the 90+ degree day.
I also finished another pair of the cabled gloves (in hot pink! I still need photos) and another hat out of handspun by Frances, which I will take pictures of and post soon.
I'm currently working on a pair of socks for my mom's birthday (which was in August...) and am hoping to have them done by October 16th at the latest. They're going alarmingly quickly so far, though, which is a good sign.
Sunday, July 5, 2009
Sunset Shawl
Wow, long time no post. There's a good reason for that, though. I have been working on my Sunset Shawl since March 19th. It's finally done: the last nupps and beads added, bound off, and blocked. It was an adventure every step of the way, and I thoroughly enjoyed both the pattern and the finished project.
Specs:
Needles: Size 4 circs (Knit Picks options)
Yarn: Knit Picks' Shadow in Sunset Heather, 2.5 skeins for a total of ~1100 yards
Beads: 2.5 packets of 6/0 Glass Seed Beads in plated gold. I refused to count how many at the moment. Maybe if I'm stuck on a desert island with nothing but that shawl I will feel like counting. Maybe not.
Time to complete: ~16 weeks (3 seasons of Gilmore Girls, 1 season of BSG, 4 seasons of Bones, 1 season of Castle, 1 season of Burn Notice)
On with the story (and pictures)!
So I cast on and did over 7 repeats of the first chart before realizing... the color used to denote plain purls and the color used to denote bead placement are exactly the same when printed in black and white. (The result of this confusion is pictured in a previous post) I decided that I would be happier actually putting the beads on, so I ripped the entire thing out. This required a drink, as I had already put many hours into this project. I also may have cried a bit. I will admit to nothing, though.
Here's a picture of the first 4 or so repeats with me actually including the beads
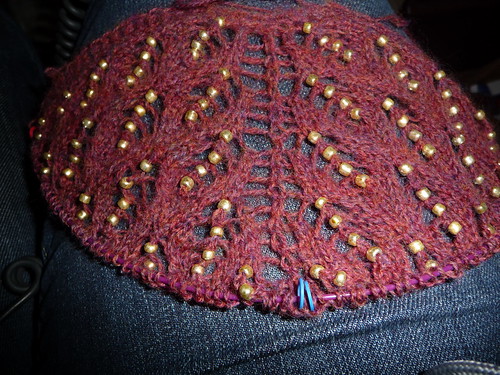
Around 9 pattern repeats

And around here it got too big to fold out for a reasonable picture. So I didn't take any until I cast off and blocked. Here's a picture of my (rather non-standard) blocking technique.
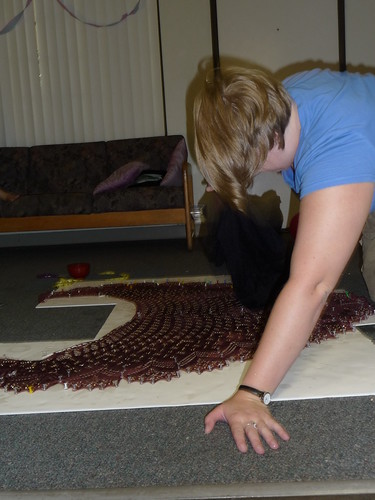
Yes, that is me having pinned the shawl out already and wetting it by pouring water over it and using a towel to make sure it was all absorbed. I realize you are supposed to get the shawl wet and then block, but for some reason this didn't seem like a good idea at the time. I'm not recalling why.
As you can see, I used pushpins in a foam board to block, and pinned out each little point individually.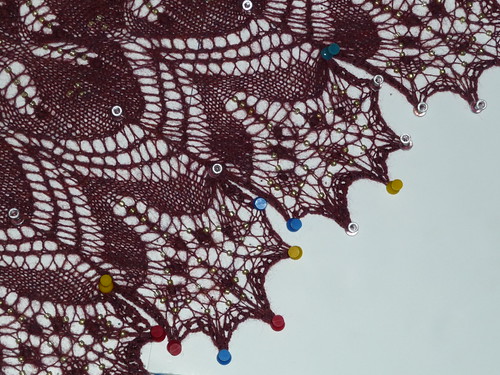
The whole shawl didn't quite fit on the board (as shown below) but I pinned out the few points that didn't fit the next day individually, and it seemed to work.
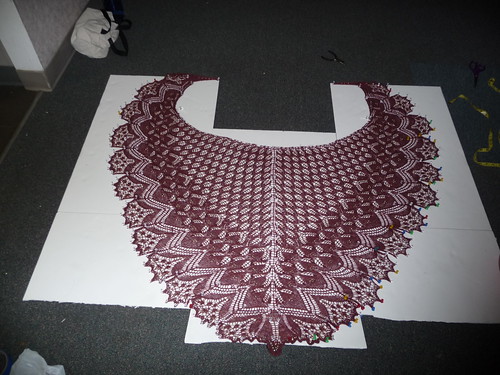
And finally... it was done. The pushpins were slightly rusted, but the yarn wasn't affected by it, thankfully.
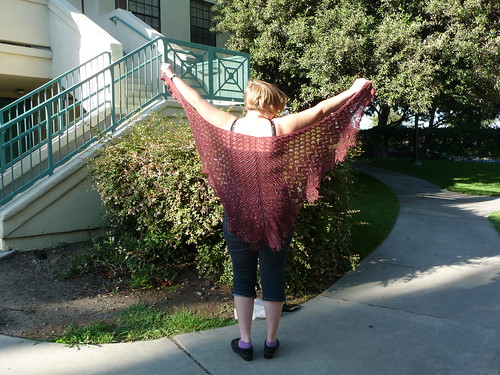
Not the best picture of me, but shows off the shawl reasonably well:
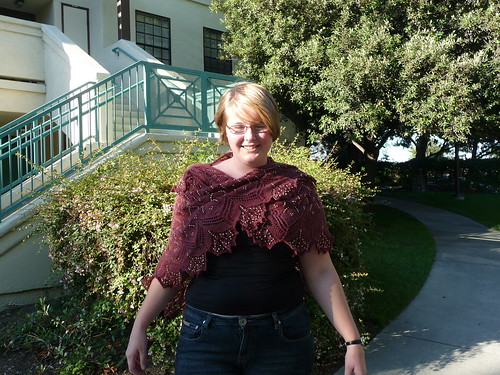
It's really big!
Now on to knitting a hat!
Specs:
Needles: Size 4 circs (Knit Picks options)
Yarn: Knit Picks' Shadow in Sunset Heather, 2.5 skeins for a total of ~1100 yards
Beads: 2.5 packets of 6/0 Glass Seed Beads in plated gold. I refused to count how many at the moment. Maybe if I'm stuck on a desert island with nothing but that shawl I will feel like counting. Maybe not.
Time to complete: ~16 weeks (3 seasons of Gilmore Girls, 1 season of BSG, 4 seasons of Bones, 1 season of Castle, 1 season of Burn Notice)
On with the story (and pictures)!
So I cast on and did over 7 repeats of the first chart before realizing... the color used to denote plain purls and the color used to denote bead placement are exactly the same when printed in black and white. (The result of this confusion is pictured in a previous post) I decided that I would be happier actually putting the beads on, so I ripped the entire thing out. This required a drink, as I had already put many hours into this project. I also may have cried a bit. I will admit to nothing, though.
Here's a picture of the first 4 or so repeats with me actually including the beads
Around 9 pattern repeats
And around here it got too big to fold out for a reasonable picture. So I didn't take any until I cast off and blocked. Here's a picture of my (rather non-standard) blocking technique.
Yes, that is me having pinned the shawl out already and wetting it by pouring water over it and using a towel to make sure it was all absorbed. I realize you are supposed to get the shawl wet and then block, but for some reason this didn't seem like a good idea at the time. I'm not recalling why.
As you can see, I used pushpins in a foam board to block, and pinned out each little point individually.
The whole shawl didn't quite fit on the board (as shown below) but I pinned out the few points that didn't fit the next day individually, and it seemed to work.
And finally... it was done. The pushpins were slightly rusted, but the yarn wasn't affected by it, thankfully.
Not the best picture of me, but shows off the shawl reasonably well:
It's really big!
Now on to knitting a hat!
Monday, March 30, 2009
News From the Rome End of the Spectrum
Hello all!
As it has been months since I have posted anything, and Alexis is being productive and all, I thought I would make an appearance. Life on this side of the Atlantic is fun- sadly, knitting is not involved as often as it should be. Here are the projects I have been working on:

I knit a pair of fingerless gloves out of sock weight yarn- yes, I'm a little insane, no, I don't regret it. As you can probably tell, I have yet to finish weaving in the ends, and they need to be blocked a bit, but such is life. I made up the pattern myself- it's a pretty standard glove pattern, really- and knit them with knitpicks essential tweed sock yarn (note the little flecks) (it's mostly wool with some nylon)- I really like the color, which has unfortunately been discontinued, but I also like the yarn because it knits up really soft. The gloves used under a skein, so with the remaining skein that I have of it I'm doing another pair- these ones have cabling and will be a bit fancier. I might also leave off the half fingers- they're nice, but kind of a pain to knit.
After I finish weaving in the ends, I still have enough yarn for either a pair of socks or more gloves- we'll see what happens. In the meanwhile, I have found my knitting plans for the summer:
http://www.entropyhouse.com/penwiper/who/extermaknit.html
http://members.peak.org/~jhyde/hydecodolls/rassilon.htm
Be afraid. Be very afraid.
Saturday, March 28, 2009
Arrr!
As one of the many gifts I made for birthdays and winter holidays this year, I decided I should make a pirate hat for my friend. I started this back in September, but just finished over spring break.
Specs:
Yarn: Knit Picks' Wool of the Andes in Coal, 6 skeins (I'm fairly sure this is the right yarn...) held double
Needles: Size 11
Pattern: From knitlikeapirate.com
 I was kind of skeptical about this pattern, but it actually worked really well, and the yarn felted beautifully (I just stuck it in the washer on hot with a pair of jeans and hoped for the best. I can't open the dorm washers halfway through, so it was a little terrifying.)
And here's the progress on the shawl! Sorry it's a bit curled up at the bottom, I obviously haven't blocked it yet. It's growing nicely, though. Just finished the 7th repeat of the Yucca chart (the first chart.) Five more to go, and then I get to change patterns! Yay!

Thursday, March 19, 2009
Socks for Sasha and the Start of a Shawl
Spring break in Alexis-land means time for knitting... so I finished up a pair of socks for my friend Sasha.
Size: to fit size 8 feet
Yarn: Knit Picks Essential Sock Yarn in Burgundy
Needles: Size 2
Pattern: The Yarn Harlot's Sock Recipe (From Knitting Rules)

Yes, I knit on the beach
Eye of Partridge heel
And I started what is likely the hardest project I have ever attempted. The pattern is Aeolian from Knitty. I'll be using the Knit Picks Shadow in Sunset Heather on size 4 needles. I had a bit of trouble with the cast-on (it was a crocheted provisional cast-on) so I changed it to a knit provisional cast-on and used the cable from my circs as the "waste yarn." It's obviously not very pretty yet, since I'm only a little ways in and it's not blocked or anything... but this should give you an idea of the crazy:

Those are the beads I will be using with it, as well. It's supposed to have somewhere upwards of 2000 beads (and this is my first time using them!) Hopefully I'm not biting off more than I can chew. Especially since I don't think yarn tastes particularly good.
I'll post pictures of the felted pirate hat I made soon!
Size: to fit size 8 feet
Yarn: Knit Picks Essential Sock Yarn in Burgundy
Needles: Size 2
Pattern: The Yarn Harlot's Sock Recipe (From Knitting Rules)

Yes, I knit on the beach

Eye of Partridge heel

And I started what is likely the hardest project I have ever attempted. The pattern is Aeolian from Knitty. I'll be using the Knit Picks Shadow in Sunset Heather on size 4 needles. I had a bit of trouble with the cast-on (it was a crocheted provisional cast-on) so I changed it to a knit provisional cast-on and used the cable from my circs as the "waste yarn." It's obviously not very pretty yet, since I'm only a little ways in and it's not blocked or anything... but this should give you an idea of the crazy:

Those are the beads I will be using with it, as well. It's supposed to have somewhere upwards of 2000 beads (and this is my first time using them!) Hopefully I'm not biting off more than I can chew. Especially since I don't think yarn tastes particularly good.
I'll post pictures of the felted pirate hat I made soon!
Thursday, March 12, 2009
Pinwheel blanket
Project Details:
Knit with KnitPicks' Shine Worsted in Wisteria, Grass, Sea Spray (discontinued), Wave (discontinued), and Bachelor Button
Used 20 balls of yarn (roughly 1 kg or 1500 yards)
Used size 6 nickel plated interchangeable circular needles from KnitPicks
Pattern: Modified (heavily) Pinwheel Blanket
Lined with fleece
Blanket diameter is 50 inches (about 4 feet)
Started: February 2008
Finished: March 2009
This was by far the largest project I have ever done. Each piece took about 3 hours to knit up, another 45 minutes or so to seam, and about 20 minutes to stitch the backing onto (not that I did that individually - I'm not crazy! Oh, wait...) Plus the time to actually pin the blanket to the backing (harder than it sounds) it probably took the better part of 45 hours actual work time to complete. Plus it was all stockinette... fast? yes, boring? also yes. Anyway, I'm quite pleased with how it turned out.
So I started off really liking the pinwheel blankets I kept seeing crop up. They were cute, I liked the swirl, and I liked the way you could play with colors on them. I did not like the fact that the color strips and pinwheel stripes were perpendicular. So I decided to do each section a separate color. Since knitting in the round would not be easy if I changed colors so frequently, I decided to knit each piece and then seam them together. (I could have knit it all together and just left one opening, but that would be a really big project to carry around, and I didn't think of it.)
I cast on two stitches, purled them, knit across to the last stitch, did a yarn-over, knit the last stitch, and purled back. it went on like this. And on. And on. Basically I decided that since I had 4 balls of each color yarn, I should use two for each section. Maybe a little less in case one ball was short. I wound up casting off when I got to 80 stitches. Eventually I wound up with 5 pieces. I decided that this would be a good time to start seaming, since I could lay the colors all out together and see the order I wanted them in. I also figured that this way I wouldn't have to do all the seaming at once. It was a good plan.
This is what the first five pieces looked like when seamed together:

It was a bit curlier than I wanted, but I figured that would go away when I finished. I was right. Here's a closeup of the fabric:

Miles of stockinette are pretty boring to talk about, so I will skip all of that. There was some excitement when, at the very end of the very last section (which happened to be in Grass) I ran out of yarn. On the last row. No lie. Everything else I'd had extra on, but not the grass, apparently. So I had to order another skein, wait for that, and then join so I could cast off. Another note about the yarn: It doesn't exactly pill, but quite a bit of the fiber will come off on your hands as you work with it. It will get everywhere. It doesn't seem to do this once it's knit up and washed, however. It's very soft and shiny though, which I feel makes up for the little bits of colorful yarn all over my room and clothing.
Finally I finished, though, seamed it all together, and wove in all my ends. I realized that I did not like how the backside looked, and it was not going to be very warm since it was cotton. (The reason I chose cotton in the first place was that 1) it's washable and 2) I really like heavy blankets, but often get too warm under them.) I decided to add a lining to the back of the blanket. The debate was between flannel and fleece, and fleece won out. I chose a nice neutral grey that will (hopefully) not show stains. I put them both through the washer (cold water) together, to make sure they wouldn't shrink differently once they were sewn together.
Keeping in mind that I am not a sewer, have never been a sewer, and probably will never be a sewer (straight lines are hard, okay??) It took me a while to figure out how to attach the fleece. Eventually I decided I'd just do a simple running stitch all the way around with one of the yarns I had some extra of (the Grass.) I set to work pinning the blanket to the fleece. The first attempt went badly and I wound up with a strange ovoid shape that I *could not* make into a circle. No matter how hard I tried. Then I got smart: I stretched the blanket out, measured the radius (25") picked a point on the fleece to call the center, and measured 25 inches out from there all the way around until I had a circle (I marked it with a permanent marker.) Then I pinned the blanket down. I still was having trouble, though, because I'd stretch out some of the sections and other sections wound end up squooshed. I realized that I knew the radius, could calculate the circumference, and could divide that by 10 to tell me how wide each section should be. I then measured these out and pinned. It worked beautifully.
Here is a picture of the pinned blanket, with a quarter on it for size reference:

After that, all that was left was to sew. So I started in. I started off just doing tiny little stitches and attaching to every stitch in the row I chose (about an inch in). This came out looking uneven, bunching, and took way too long. I pulled it all out, decided that stitches of half an inch each would do wonderfully, and proceeded to measure every single stitch as it went in. Again, I picked a row about an inch in, and I counted three knit stitches between each sewn stitch. This was tedious, but produced a really nice, even stitching.
Stitching!

Once that was done, I tacked the middle of the blanket to the fleece, and trimmed the fleece so it went bout a centimeter past the stitching.
It's done! And Mr. Bear likes it very much...

I'm still debating if I want to add more tacking, and if so, where. But for now, I'm very happy with my heavy, cozy, warm, colorful blanket.
Knit with KnitPicks' Shine Worsted in Wisteria, Grass, Sea Spray (discontinued), Wave (discontinued), and Bachelor Button
Used 20 balls of yarn (roughly 1 kg or 1500 yards)
Used size 6 nickel plated interchangeable circular needles from KnitPicks
Pattern: Modified (heavily) Pinwheel Blanket
Lined with fleece
Blanket diameter is 50 inches (about 4 feet)
Started: February 2008
Finished: March 2009
This was by far the largest project I have ever done. Each piece took about 3 hours to knit up, another 45 minutes or so to seam, and about 20 minutes to stitch the backing onto (not that I did that individually - I'm not crazy! Oh, wait...) Plus the time to actually pin the blanket to the backing (harder than it sounds) it probably took the better part of 45 hours actual work time to complete. Plus it was all stockinette... fast? yes, boring? also yes. Anyway, I'm quite pleased with how it turned out.
So I started off really liking the pinwheel blankets I kept seeing crop up. They were cute, I liked the swirl, and I liked the way you could play with colors on them. I did not like the fact that the color strips and pinwheel stripes were perpendicular. So I decided to do each section a separate color. Since knitting in the round would not be easy if I changed colors so frequently, I decided to knit each piece and then seam them together. (I could have knit it all together and just left one opening, but that would be a really big project to carry around, and I didn't think of it.)
I cast on two stitches, purled them, knit across to the last stitch, did a yarn-over, knit the last stitch, and purled back. it went on like this. And on. And on. Basically I decided that since I had 4 balls of each color yarn, I should use two for each section. Maybe a little less in case one ball was short. I wound up casting off when I got to 80 stitches. Eventually I wound up with 5 pieces. I decided that this would be a good time to start seaming, since I could lay the colors all out together and see the order I wanted them in. I also figured that this way I wouldn't have to do all the seaming at once. It was a good plan.
This is what the first five pieces looked like when seamed together:
It was a bit curlier than I wanted, but I figured that would go away when I finished. I was right. Here's a closeup of the fabric:
Miles of stockinette are pretty boring to talk about, so I will skip all of that. There was some excitement when, at the very end of the very last section (which happened to be in Grass) I ran out of yarn. On the last row. No lie. Everything else I'd had extra on, but not the grass, apparently. So I had to order another skein, wait for that, and then join so I could cast off. Another note about the yarn: It doesn't exactly pill, but quite a bit of the fiber will come off on your hands as you work with it. It will get everywhere. It doesn't seem to do this once it's knit up and washed, however. It's very soft and shiny though, which I feel makes up for the little bits of colorful yarn all over my room and clothing.
Finally I finished, though, seamed it all together, and wove in all my ends. I realized that I did not like how the backside looked, and it was not going to be very warm since it was cotton. (The reason I chose cotton in the first place was that 1) it's washable and 2) I really like heavy blankets, but often get too warm under them.) I decided to add a lining to the back of the blanket. The debate was between flannel and fleece, and fleece won out. I chose a nice neutral grey that will (hopefully) not show stains. I put them both through the washer (cold water) together, to make sure they wouldn't shrink differently once they were sewn together.
Keeping in mind that I am not a sewer, have never been a sewer, and probably will never be a sewer (straight lines are hard, okay??) It took me a while to figure out how to attach the fleece. Eventually I decided I'd just do a simple running stitch all the way around with one of the yarns I had some extra of (the Grass.) I set to work pinning the blanket to the fleece. The first attempt went badly and I wound up with a strange ovoid shape that I *could not* make into a circle. No matter how hard I tried. Then I got smart: I stretched the blanket out, measured the radius (25") picked a point on the fleece to call the center, and measured 25 inches out from there all the way around until I had a circle (I marked it with a permanent marker.) Then I pinned the blanket down. I still was having trouble, though, because I'd stretch out some of the sections and other sections wound end up squooshed. I realized that I knew the radius, could calculate the circumference, and could divide that by 10 to tell me how wide each section should be. I then measured these out and pinned. It worked beautifully.
Here is a picture of the pinned blanket, with a quarter on it for size reference:
After that, all that was left was to sew. So I started in. I started off just doing tiny little stitches and attaching to every stitch in the row I chose (about an inch in). This came out looking uneven, bunching, and took way too long. I pulled it all out, decided that stitches of half an inch each would do wonderfully, and proceeded to measure every single stitch as it went in. Again, I picked a row about an inch in, and I counted three knit stitches between each sewn stitch. This was tedious, but produced a really nice, even stitching.
Stitching!
Once that was done, I tacked the middle of the blanket to the fleece, and trimmed the fleece so it went bout a centimeter past the stitching.
It's done! And Mr. Bear likes it very much...
I'm still debating if I want to add more tacking, and if so, where. But for now, I'm very happy with my heavy, cozy, warm, colorful blanket.
Thursday, February 19, 2009
Firebird Fingerless Gloves
These gloves went through many changes from when I bought the yarn to when I knit them, but I rather like how they came out. They were initially meant to have half fingers and say "firebird" across the knuckles, but that idea was tossed in favor of not knitting half fingers (they're annoying, and hard to get to fit correctly.) I used Knit Picks' Telemark in Flame Heather, with size 4 needles. I made the pattern up to some extent as I went along.
The cuff was done in a mistake rib pattern - I cast on with a 4x + 3 stitches on one side and 4x + 5 stitches on the other. I realize that this makes them slightly different sizes, but it was the best way I could think of to make the rib spin opposite directions. Where by "best" I mean "simplest while knitting." And the two stitches really doesn't make that much of a difference in sizing.

The idea was that the cuffs would serve as a nice tail to an embroidered firebird, but decided to leave them simpler. The increases for the thumb were borrowed from the Chevelier pattern mentioned earlier. A few rows of mistake ribbing were also added to the edge of the thumb, and to the top of the gloves to bring the pattern together.
And yes, that's me hiding behind the gloves in the picture.
 I used Knit Picks' Telemark in Flame Heather, with size 4 needles. I made the pattern up to some extent as I went along.
The cuff was done in a mistake rib pattern - I cast on with a 4x + 3 stitches on one side and 4x + 5 stitches on the other. I realize that this makes them slightly different sizes, but it was the best way I could think of to make the rib spin opposite directions. Where by "best" I mean "simplest while knitting." And the two stitches really doesn't make that much of a difference in sizing.

The idea was that the cuffs would serve as a nice tail to an embroidered firebird, but decided to leave them simpler. The increases for the thumb were borrowed from the Chevelier pattern mentioned earlier. A few rows of mistake ribbing were also added to the edge of the thumb, and to the top of the gloves to bring the pattern together.
And yes, that's me hiding behind the gloves in the picture.
Monday, February 2, 2009
Fetching
With some of the yarn left over from my star hat, I made "Fetching" gloves from knitty. These pictures are actually my second pair of the gloves- I made the first out of some of the blue yarn, and left them at home with my mom before I took pictures of them.  I like stiff gloves (and I still like playing around with gauge) so these are made with Berocco Peruvia on size three needles. They were a bit stiff at first, but they're quite warm and as I have worn them they have gotten a lot softer. Because my stitches were a bit shorter than the pattern called for, I did increase the number of rows in the body of the hand- 21 instead of 18- but otherwise the pattern remains unchanged.

 I like stiff gloves (and I still like playing around with gauge) so these are made with Berocco Peruvia on size three needles. They were a bit stiff at first, but they're quite warm and as I have worn them they have gotten a lot softer. Because my stitches were a bit shorter than the pattern called for, I did increase the number of rows in the body of the hand- 21 instead of 18- but otherwise the pattern remains unchanged.
Monday, January 19, 2009
Cabled Gloves
I found a really cute mitten pattern online here (the pattern is available for free at the right of that page.) I didn't want to make full mittens though, since I find fingers to be quite useful. So I modified the pattern a bit, and cast on for fingerless gloves made using a slightly adjusted version of the cabling.

Here's the first little bit of knitting on them. You can see a little bit of the Harmony DPNs I was working with.
The knitting went really well. I finished the first glove without a problem, and the second one flew by as well. I weaved in the ends of the 2nd glove, tried them on, and this is what I saw:


I (accidentally) did an extra bit of cabling on the second (left-hand) glove! The result was that a) it looked funny and b) the gloves were different lengths. Luckily it was a quick fix - just ripped back 6 or 7 rows and knit the 4 I was supposed to. Here's a picture of the finished product:

(That's a picture of me behind them, unfortunately, I don't have a picture of them on the recipient.)
If you're interested:
Yarn: Telemark from KnitPicks in Cobalt
Needles: Size 4 (Harmony DPNs)
Pattern: Chevalier
Sunday, January 18, 2009
Shedir
For Christmas my college friends sent me the pattern, needles and yarn to knit Shedir, a cabled hat from knitty. I really like cabling, and the pattern on this hat is beautiful. It's also pretty complex, which is nice- I like it when my knitting makes me think, especially when it is winter break and I have plenty of time to knit when I'm not studying.  Unusually for me, I didn't fuss with the pattern, other than the original yarn substitution. I've seen many versions of this hat online, and most people repeated the saxon braid 3 or 4 times instead of the 5 that the pattern calls for. I repeated it 5 times- the resulting hat is very deep- it covers my ears- but I like this in a winter hat. If you prefer hats that don't cover most of your forehead, I would suggest doing the repeat only 4 times- the hat was designed as a chemo hat, so the goal is to cover over people's hairlines.
 This version was knit with Cascade 220 superwash wool, color 866. The pattern calls for size three needles, creating a nice, dense hat. Nice and warm to wear out in the snow. I also have a but of an obsession with knitting yarn on oddly-sized needles, if you haven't noticed- I like the resulting changes in texture.
The pattern, if you are interested, is available at: http://www.knitty.com/ISSUEfall04/knittyF04surp.pdf. Happy knitting!
 Unusually for me, I didn't fuss with the pattern, other than the original yarn substitution. I've seen many versions of this hat online, and most people repeated the saxon braid 3 or 4 times instead of the 5 that the pattern calls for. I repeated it 5 times- the resulting hat is very deep- it covers my ears- but I like this in a winter hat. If you prefer hats that don't cover most of your forehead, I would suggest doing the repeat only 4 times- the hat was designed as a chemo hat, so the goal is to cover over people's hairlines.
  This version was knit with Cascade 220 superwash wool, color 866. The pattern calls for size three needles, creating a nice, dense hat. Nice and warm to wear out in the snow. I also have a but of an obsession with knitting yarn on oddly-sized needles, if you haven't noticed- I like the resulting changes in texture.
 The pattern, if you are interested, is available at: http://www.knitty.com/ISSUEfall04/knittyF04surp.pdf. Happy knitting!
Saturday, January 17, 2009
Star Hat
Sometimes, I enjoy a spot of color work. I'm particularly fond of fair isle, but I'm willing to try pretty much anything.
This hat is a variation on the "Sunny Flower Fez" from the book Folk Knits. I say variation because I'm generally incapable of following patterns and in this instance changed the color scheme, yarn choice, yarn weight in general, needle size, gauge, and embroidery pattern. (Don't worry, the hat still fits!) (To be fair, the substitutions were made in a calculated, planned out fashion. It fits quite well.) I knit this with Berroco Peruvia, which is a 100% wool yarn that I am quite fond of. The colors here are saddle brown (a dark brown heather), boysenberry (a purple heather), palomino blue (a turquoise heather) and abusar (a blue heather). I knit it with size seven needles (the ball band recommended size 10s, the pattern recommended 5s, I own 7s) so the fabric is a bit on the dense side, which I find desirable in a winter hat. Since the hat didn't remind me of flowers in the colors that I knit it (what kind of flower has a turquoise center?) I embroidered points instead of petals.
Because of the larger gauge, the hat knit up pretty quickly, and I can say from personal experience that it is quite warm and soft. And, most excitingly, I have a lot of leftover yarn...
This hat is a variation on the "Sunny Flower Fez" from the book Folk Knits. I say variation because I'm generally incapable of following patterns and in this instance changed the color scheme, yarn choice, yarn weight in general, needle size, gauge, and embroidery pattern. (Don't worry, the hat still fits!) (To be fair, the substitutions were made in a calculated, planned out fashion. It fits quite well.)
 I knit this with Berroco Peruvia, which is a 100% wool yarn that I am quite fond of. The colors here are saddle brown (a dark brown heather), boysenberry (a purple heather), palomino blue (a turquoise heather) and abusar (a blue heather). I knit it with size seven needles (the ball band recommended size 10s, the pattern recommended 5s, I own 7s) so the fabric is a bit on the dense side, which I find desirable in a winter hat. Since the hat didn't remind me of flowers in the colors that I knit it (what kind of flower has a turquoise center?) I embroidered points instead of petals.
 Because of the larger gauge, the hat knit up pretty quickly, and I can say from personal experience that it is quite warm and soft. And, most excitingly, I have a lot of leftover yarn...
Wednesday, January 14, 2009
Simple Scarf
In addition to doing fun cables and interesting things with yarn, sometimes I really like to have a basic project. They're perfect for knitting during movies or other times where I'd like my attention to be elsewhere. This winter, I finally used some yarn I received last Christmas, it was by Berroco Hip-Hop, a really bright multicolored thick-and-thin yarn. Here's what it looked like before knitting it up

I cast on 24 stitches on size 13 needles and knit in 2x2 rib for two skeins worth of yarn.
The result was this scarf

And here's a closeup of the fabric

I haven't worked much with thick-and-thin yarns before (or singles for that matter). It was definitely tricky keeping tension even, and I found that with this yarn I got a lot of yarn doughnuts, which was annoying. It's also very fuzzy, which you can get a sense of from that last picture.
I cast on 24 stitches on size 13 needles and knit in 2x2 rib for two skeins worth of yarn.
The result was this scarf
And here's a closeup of the fabric
I haven't worked much with thick-and-thin yarns before (or singles for that matter). It was definitely tricky keeping tension even, and I found that with this yarn I got a lot of yarn doughnuts, which was annoying. It's also very fuzzy, which you can get a sense of from that last picture.
Subscribe to:
Posts (Atom)